This article was originally published in the “Inner Product” column in Game Developer Magazine, May 2006
DOWNLOAD
630K
A common effect in video games is some kind of damage being applied to walls and other surfaces when they are shot, usually by the player. This effect makes the player feel like they are actually affecting the environment around them, and makes the simple act of shooting a wall somewhat satisfying.
In an idea situation, when the player shoot the wall, chunks of the wall would fly off, leaving actual holes in the wall, eventually the wall would be chipped away until it falls to rubble in front of you. Unfortunately implementing such a general purpose solution is very complex and expensive, since it requires the creation of arbitrary amounts of new geometry and possibly textures.
DECALS
A more common technique is to apply a decal to the wall. A decal is a two dimensional image of some damage, such as a bullet hole, that is pasted in some way over the surface of the environment geometry. Decals are also used for other player instantiated modifications to the world, such as spraying graffiti and blood spatters.
There are several ways of implementing decals. You can create a new quad that is aligned with the wall surface with the decal texture face mapped to that quad. You can make a copy of a section the wall geometry, and position the decal by adjusting UV coordinates. You can apply the decal as an additional rendering pass on the original geometry.
Each of these methods has their pros and cons, and the method you use will depend on what you generally use decals for. For bullet holes it’s useful to have an arbitrary number of holes scattered around (since you will want to spay bullets all over the wall). In this situation it’s probably best to create a new quad for each new bullet hole.
PARALLAX MAPPING
The problem with decals is that they are two-dimensional. While this works fine for graffiti and blood splats, the player expects a bullet hole to have some depth, so a flat image of a bullet hole is less than convincing. The solution here is to use a pixel shader technique called “parallax mapping” to give the illusion of depth to a 2D texture.
Parallax mapping is a surprisingly simple technique, but can be quite difficult to visualize exactly how it works. Basically we store a per-pixel depth map for the decal texture, then for each pixel rendered, we offset the UV coordinates based on the depth at that pixel, and the view vector. This is best explained with a working example.
CREATING THE ASSETS
First we need a bullet hole. Initially we create a detailed 3d textured model (see figure 1). This model is excessively detailed, over 1000 polygons. But that’s not important, as we are only using it to generate our decal texture and the depth map.

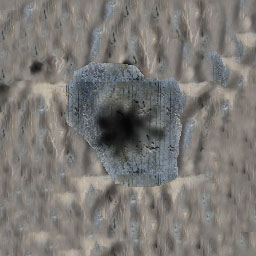
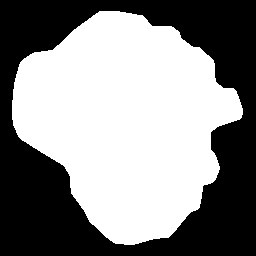
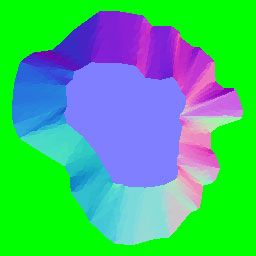
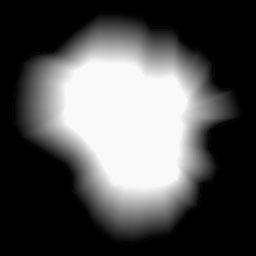
From the model, we render the diffuse map (figure 2a), which contains an alpha channel that matches the outline of the hole (figure 2b). We also render a normal map (figure 3a), which has a depth map in the alpha channel (figure 3b). A combined normal and depth map is often referred to as a “relief map” .
There are a number of different ways of generating the depth and normal maps. You could draw the depth map by hand. If you look at figure 3b, you can see it is fairly simple. The wall surface is black, a depth value of zero. The flat bottom of the bullet hole is white, a depth value of 255 (which is 1.0 in the shader, see later). The walls of the bullet hole are a smooth gradient from black to white. You could draw this depth map roughly by hand, and then generate the normal map from the depth map using any one of several free tools.
However you’ll get better results if you generate the depth map and the normal map directly from a 3D model. I generated the examples show using 3D Studio Max, and the “Render to Texture” function to generate a matching pair of diffuse map and relief map from the high resolution model. All of the assets I use here, together with the shader code, can be downloaded from gdmag.com.
DOING THE MATH
When rendering a triangle at the pixel level, consider a point P on that triangle. If we were rendering a triangle in the ordinary manner, then that point would have uv coordinates associated with it, and also we would have the view vector v. Given the uv coordinates, we would normally just sample the texture and then use this color to apply lighting, etc. Instead, with parallax mapping we perform a number of very simple additional steps:
1) Read the depth at this uv coordinates
2) Transform the view vector into tangent space
3) Scale the view vector by the depth we just read
4) Add the x and y components to the u and v coordinates
5) Use the new uv coordinates.
The math here is very simple. The most complex sounding part is step 2, transforming the view vector into tangent space. The view vector is the vector from the camera to the pixel in view space (meaning the camera rotation has already been applied by the vertex shader). Tangent space is a coordinate system defined by three basis unit vectors: the normal, binormal and tangent vectors. These basis vectors can vary per pixel. To translate into tangent space, you form a rotation matrix from the basis vectors and then multiply the vector by this.
When we have the view vectors in tangent space, we have the situation shown in figure 4. This shows a cross section of the bullet hole. The point we are rendering is P, the view vector in tangent space is v. Since this is a cross-section, you can’t see the y component, so we are only looking at the x component (left to right) and the z component (up).

Figure 4 – Ofsetting the source pixels by the view vector scaled by the depth
At the point P, we read the depth of the bullet hole d. The view vector is normalized, and then scaled by d, (and by an arbitrary constant you can use to make holes deeper or shallower). The resultant vector is then added to the uv coordinates from point P, ignoring the Z component, which gives us the uv coordinates for a new virtual point P’. (Note in figure 4, v is a vector, and d is just the scalar depth, not a vector).
It is important when trying to visualize what is going on here that you realize that the points that we render do not themselves move around. All that is happening is that we are adjusting the uv coordinates of the point P so they match the uv coordinates of P’. P is still rendered at position P, just with the uv coordinates of P’. Think of it as the point you are rendering pulling its texture from a bit further away. The greater the depth and the greater the angle between the view vector and the surface, the greater the distance from the rendered point to the actual point used in the texture.
MODIFYING THE SHADERS
Listing 1 – modifying the uv coordinates in the pixel shader
// Given the regular uv coordinates
float2 uv = IN.TexCoord0*tile;

      // Step 1 - Get depth from the alpha (w) of the relief map
	float depth = (tex2D(reliefmap,uv).w) * hole_depth;

	// Step 2 - Create transform matrix to tangent space
	float3x3 to_tangent_space = float3x3(IN.binormal,IN.tangent,IN.normal);

	// Steps 2 and 3
      float2 offset = depth * mul(to_tangent_space,v);

      // Step 4, offset u and v by x and y
	uv += offset;
Listing 1 shows the actual implementation of this extra processing in a pixel shader. The view vector, the uv coordinates and the basis vectors are passed to the pixel shader by the vertex shader. The remaining code in the pixel shader is exactly the same as a regular pixel shader in terms of lighting, etc. All that is added are the steps above, which modify the UV coordinates.
RESULTS
The word “parallax” refers to the effect where objects that are closer to the viewer move more than object that are at a greater distance, when the viewer moves their position at right angles to those objects. As such, the parallax effect is best appreciated in motion. Figure 5 shows the bullet holes mapped onto a plane with and without parallax mapping. Figure 5a shows the bullet holes rendered in the normal manner. Figure 5b shows them with parallax mapping. In these static images there is not so much difference, but note how the closer sides of the hole have shrunk, and the far sides have grown.

Figure 5a – Standard bump mapping

Figure 5b – Parallax mapping
SIMPLE OCCLUSION
Parallax mapping is a simple technique, which means that it’s relatively cheap, and it’s compatible with more graphics cards than a ray-casting solution. However, it is still only a very approximate mapping to what you would actually want to see on screen, and suffers from a number of problems. The most obvious of these is that there is no occlusion. You can always see all of the texture, it is just distorted. In addition, as the texture shifts around, there is more distortion as the base of the bullet hole seems to climb partially up the sides of the hole.
In the general case of parallax mapping, there is no cheap solution to this; you would need to do some iteration in your shader. However, in the rather specific case of a basically concave bullet hole with a flat base we can make certain assumptions that allow us to greatly improve the appearance without an excessive performance hit.
Firstly we note that the base of the bullet hole has a constant depth value of 1.0. We’d like the base of the hole not to be distorted, and to be properly occluded. We can do this by first assuming the point P has a depth of 1.0, then finding the modified uv. If this then also has a depth of 1.0, then we know that this ray actually intersects the base of the hole, regardless of the depth at point P. If it does NOT, then we re-calculate the offset using the depth at point P. Occlusion is then taken care of by the base pixels sliding behind the alpha mask. The relative movement of the base also becomes more realistic.
To implement this modification, we remove the initial lookup of depth, and replace the calculation of the offset with Listing 2. This takes our pixel shader from 35 to 40 instructions on a GeForce 6800 GT (including lighting.)
Listing 2 – occluded base
        float2 offset = hole_depth * mul(to_tangent_space,v);
        if (tex2D(reliefmap,uv+offset).w < 0.96)
        {
           offset *= (tex2D(reliefmap,uv).w);
        }
LESS DISTORTION
Things now look a little better, however we still have a problem with the texture streaking when viewed from extreme angles, especially near the rim of the hole on the side further away from the viewer. The problem here is that the depth at point P is 1.0, yet the ray actually intersects the rim fairly close to the top, where P is closer to 0.1. We can get a surprisingly effective improvement here simply by averaging the two depth values we read earlier. Again this is a simple and cheap modification, requiring no iterations, and only adds 2 instructions to our shader.(Listing 3).
        float2 offset = hole_depth * mul(to_tangent_space,v);
        float depth_at_1 = tex2D(reliefmap,uv+offset).w;
        if ( depth_at_1 < 0.96f)
        {
             offset *= (depth_at_1 + (tex2D(reliefmap,uv).w)) * 0.5;
        }
PROBLEMS YOU MIGHT ENCOUNTER
The biggest problems I had in implement this were in ensuring the coordinate systems were consistent. The coordinate systems used by 3D Studio Max and DirectX are right handed and left handed respectively. Moving from one to the other requires changes in the shader. Specifically I had to change the order of the basis vectors to make the tangent space calculation come out right.
The height map we use here is actually a depth map, ranging from 0.0 to 1.0 units into the plane of the texture. Many implementations of parallax mapping map the range 0.0,1.0 to -1.0,1.0, to allow for features raised above the plane of the texture. Here we are implementing a specific shader for bullet holes, so be aware of this different when looking at other code.
You might also have problems with the sign of the height map and the normal maps. You can flip these in the shader, but it's more effective to get them right the first time, which you can quickly test by inverting components of the maps in Photoshop.
CONCLUSIONS
We can get quite realistic looking bullet holes using a relatively simple and inexpensive pixel shader. While it does not give us the full occlusion of an iterative approach, it is both quicker, and more likely to run on older graphics cards. By writing a shader specifically for a particular kind of topography, we are able to adjust the algorithm to give more pleasing results without worrying about the general case.
RESOURCES
Tomomichi KANEKO, et al, Detailed Shape Representation with Parallax Mapping, 2001, http://vrsj.t.u-tokyo.ac.jp/ic-at/ICAT2003/papers/01205.pdf
Terry Welsh, Parallax Mapping with Offset Limiting, 2004, http://www.infiscape.com/doc/parallax_mapping.pdf
William Donnelly. Per-Pixel Displacement Mapping with Distance Functions, 2005, http://download.nvidia.com/developer/GPU_Gems_2/GPU_Gems2_ch08.pdf
Great !!!
Comment by MG-RAY — February 18, 2007 @ 4:59 am
Nice. You did a great job with this tutorial, congratulations!
Comment by Jonathan Kennedy — October 28, 2007 @ 10:13 pm
EXCELLENT MAN !!!!!
Comment by JESSE — January 4, 2008 @ 10:33 pm
Wow very nice post, i also encountered some problems with the coordinate systems. Thanks to this post i made it happen! Again thanks!
Comment by Cheap Model Airplanes — December 16, 2008 @ 5:40 am
awesome man..
it was really nice n easy to understand..nice compilation.
Comment by SANKET — January 9, 2009 @ 1:41 am