Cowboy Programming Game Development and General Hacking by the Old West

January 4, 2007

Programming Poker AI

Filed under: Game Development,Inner Product — Mick West @ 6:17 pm

This article was originally published in the “Inner Product” column in Game Developer Magazine, November 2005

I recently programmed the AI for the World Series of Poker, developed by Left Field Productions and published by Activision. I started out thinking it would be an easy task. But it proved a lot more complex than I initially thought.

This article for the budding poker AI programmer provides a foundation for a simple implementation of No-Limit Texas Holdem Poker AI, covering the basics of hand strength evaluation and betting. By following the recipe set out here, you will quickly become able to implement a reasonably strong poker AI, and have a solid foundation on which to build. I assume you are familiar with the basic terminology of poker.

TEXAS HOLDEM

The goal of any game playing AI is twofold. The primary purpose is to allow the player to have a fun and enjoyable experience. The secondary purpose, subordinate to the first, is to play a strong enough game to provide sufficient challenge to the majority of players in your intended audience.

POKER DATA TYPES

You will need an implementation of the following data types. I’m going to describe them at the bit/byte implementation level, leaving the high level abstraction up to you.

A “suit” is an integer in the range 0..3, where 0=Clubs, 1=Diamonds, 2=Hearts, 3=Spades

A “rank” is an integer in the range 0..12, where 0 = 2 (deuce), 1 = 3, 11 = King, 12 = Ace. This is the cards in a suit arranged in rank order

A “card” is an integer in the range 0..51, hence
card = suit*13 + rank.
Suit = card/13
Rank = card%13

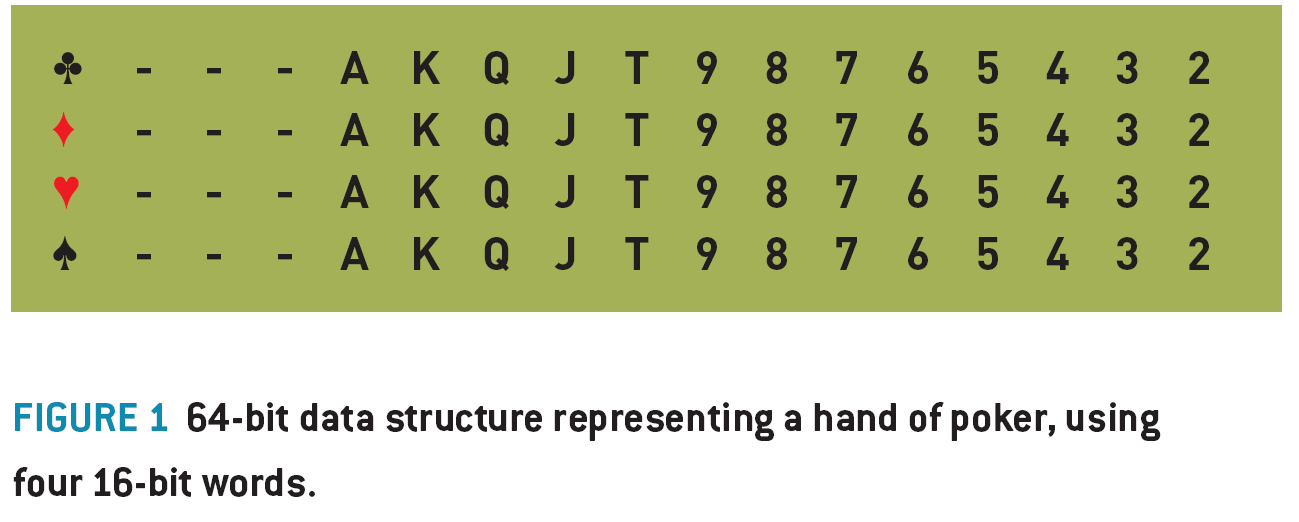
A “Hand” is a 52 bit data type, where each bit represents a single card. This can be stored as four 16 bit words for ease of use, where each 16 bit word represents the potential cards in one suit (using 13 of the 16 bits) (figure 1)

A “Hand Type” is an integer representing the type of poker hand you have, where 0= no pair, 1=pair, 2=two pair, 3=trips, 4=straight, 5=flush, 6=full house, 7=quads, 8=straight flush.

ENCODING HAND VALUES

A “Hand Value” is a 32 bit integer representing the relative value or strength of any hand of cards. By comparing two hand values, you can see which hand is stronger in a game of poker.
The hand value can conveniently be represented as a series of six 4-bit nibbles, where the most significant nibble represents the Hand Type, then the next five nibbles represent the different ranks of the cards in the order of significance to the hand value. (figure. 2)

Example 1: AH QD 4S KH 8C is a “no pair” hand type (sometimes called a “high card” , or in this case “Ace high” ). So, the hand type nibble is set to 0. The remaining nibbles in the Hand Value are filled out with the ranks of the five cards in descending order. (A, K, Q, 8, 4), which translated into rank indices: 12,11,10,6,2 (or C,B,A,6,2 in hexadecimal), and when combined with the hand type (0) in the high nibble, gives us a 32 bit integer: 0x000CBA62.

The individual suits of the cards are basically ignored in the final hand value. The only time suit is significant is when it contributes to a flush. Also, note the top two nibbles of the Hand Value are always zero.

Example 2: 4D JD 3D 4C AD is a pair of fours, with Ace, Jack, Three kickers. The hand type is a pair, (type 1), then the ranks follow, starting with the rank of the pair, then the ranks of the kickers, so 4,A,J,3, which gives us 0x0012C910.

Example 3: 7C, 6C, 5C, 4C, 3D is a straight (type 4). More specifically it’s a seven high straight. The only rank of import here is the seven (rank 5). So the hand value is encoded as 0x00450000. We save ourselves a bunch of instructions in ignoring the four low cards after we’ve determined it is a straight.

Look at the resultant hand values of the above examples, you can clearly see how the better hands always have a higher hand value, making determining the wining hand a simple comparison.

CALCULATING HAND VALUES

What we now need is a function that takes a hand, and returns a hand value. This involves determining the hand type, then inserting the nibbles for the hand ranks, as above.

A hand is four words (clubs, diamonds, hearts, spades) of 13 bits each. 13 bits can be arranged in just 8192 combination, which means we can accelerate the evaluation of a hand by pre-calculating 8K tables of things like the number of bits set in a (13 bit) word (if you have five or more of the same suit, then you’ve got a flush), or the highest card of any straight in the hand. You can also pre-calculate a table of the highest five cards from a particular bit combination, which you can then use to set the kicker cards.

If you calculate ranks = (hearts | diamonds | clubs | spades) then the value ranks is a bit-field with a bit set for every card rank that you have at least one of. The number of bits set here is the number of unique ranks you have. We calculate the number of bits in each of hearts, diamonds, clubs and spades, and subtract the number of bits in the unique ranks, giving the number of duplicated ranks, to be used as the basis of determining what type of hand you have.

Example: if you have 2D AS AH 2C 2H, you can very quickly determine that you have five cards, that there are just two unique ranks, and hence you must have either a full house or four of a kind. A few more simple tests will determine exactly what you have. The entire evaluation function will consist of tests like this, gradually whittling down the possible hand types.

Since the function consists mostly of bitwise operations, table lookups and simple comparisons, it is going to be very fast. It’s also very amenable to fine tuning optimization, and the exact implementation will depend on the target architecture. You may be able to take advantage of some processor specific instructions to greatly improve the efficiency.

CALCULATING HAND STRENGTH

Hand strength is the probability that you will win the hand, given your hole cards, the community cards, and the opponents who remain in the hand. Hand strength is a floating point number between 0.0 (certain loss) and 1.0 (certain win). For example, a HS of 0.33 means you have a 33% chance of winning.

The easiest and most flexibly way of calculating the HS is to simulate the progress of the game a very large number of time, and count the number of those times you win. Say you simulate the game 1,000 times, and in the simulation, you win 423 games, then you have a high degree of certainty of having an approximate HS of 423/1000, or 0.423.

The procedure for simulating a game is very simple:

Create a pack of cards
Set score = 0
Remove the known cards (your hole cards, and any community cards)
Repeat 1000 times (or more, depending on CPU resources and desired accuracy)
Shuffle the remaining pack
Deal your opponent’s hole cards, and the remaining community cards
Evaluate all hands, and see who has the best hands
If you have the best hand then
Add 1/(number of people with the same hand value) to your score (usually 1)
End if
end repeat
Hand Strength = score/number of loops (1000 in this case).

To be more accurate, we have to run our simulation with people dropping out if they are dealt hole cards below a certain threshold. In practice, the determination of if a player stays in or not in a simulation is a probabilistic function of the strength of their hole cards, their table position, their stack size, the blind size and their previous behavior. For now we can just modify the simulation, so after dealing the opponents hole cards, remove any non-blind players with hole cards worse than, say, a pair of sixes. While not particularly elegant, it will still give you a useful number.

POT ODDS

The pot odds number is the ratio of your bet or call to the size of the pot after you bet (the amount you will win). For example, if the bet is $20, and there is $40 in the pot, then the pot odds are 20/(20+40) = 0.333.

RATE OF RETURN

Rate of return is the “on average” proportion of how much you will multiply your bet by, if you stay in the hand.

Rate of Return = Hand Strength / Pot Odds.

The base strategy we implement is to mostly stay in hands with a rate of return greater than 1.

THE FOLD/CALL/RAISE DECISION

For each round of betting the computer needs to decide if it is going to fold, call or raise (The FCR decision). Ignoring the question for the moment of how much to raise for now, then given a Rate of Return (RR), it’s possible to provide a very simple (yet useful) mapping between RR and FCR.

If RR < 0.8 then 95% fold, 0 % call, 5% raise (bluff)
If RR < 1.0 then 80%, fold 5% call, 15% raise (bluff)
If RR <1.3 the 0% fold, 60% call, 40% raise
Else (RR >= 1.3) 0% fold, 30% call, 70% raise
If fold and amount to call is zero, then call.

Don’t pay too much attention to the precise percentages listed above, the numbers will depend on the way you calculate your hand strength, and you’ll want to vary them depending on which betting round you are in. You will also want to vary these numbers to create players with different personalities.

Using this very simple mapping between the RR and the FCR decision can give you a surprisingly reasonable and entertaining player. They will tend to play strong hands, they will occasionally bluff, they won’t scare easy if their hand is good, and they will abandon weak hands when raised, and they will stick around on a reasonable chance of a flush or straight draw, making for entertaining gameplay.

The fact that none of the percentages is 100% is also important. That means you can never deduce the hand strength of your AI opponent based on their actions (unless they fold, where the information does not really help you). If they raise, then they could have any kind of hand strength – probably a good one, but it might be the 1 in 20 times when they are bluffing with a very weak hand.

STACK PROTECTION

The simple rules above work well when your stack of chips is large and the blinds are small. However as your stack shrinks and the blinds increase then the amount of money you need to commit to stay in a hand can become a very substantial proportion of your stack. Also, occasionally other players might go “all-in” , betting their entire stack of chips, so we need some logic to prevent the AI from making bad calls when short stacked.

Say you have AD, 2D and the flop is QC, KC, 2C. So you have a pair of twos, but there is a possible flush out there. There is $500 in the pot and the bet is $100 to stay in against two player, but it’s your last $100. The pot odds are 100/600 = 0.1666, your hand strength is 0.297, so your rate of return is about 1.8. So if you could play this situation over and over again you would make on average an 80% profit each time. However, it’s your last $100, and you have about a 70% chance of loosing everything. Don’t make that bet!

To handle this we can use a simple heuristic, along the lines of:

“If my proposed bet will substantially commit my stack, then don’t do it unless I have a strong chance of winning”

which might be implemented in part by:

“if (stack- bet) < (blind * 4) and (HS < 0.5) then fold”

Meaning if the call would leave you with less than four times the big blind, then don’t call unless you have a greater than 50% chance of winning.

Poker is a complex game, with a surprisingly large number of different types of situations like this that you have to handle somehow. I recommend you have as few special cases as possible, as it reduced the risk of an exploit being introduced into the game via some obscure special case. However, you should anticipate a number of heuristics (rules of thumb) being hard coded into the AI logic.

TESTING POKER AI

Playing a quick single table game of Texas Holdem takes around 30 minutes on average with human players. Ideally you would perform your testing by having human players play against the AI and trying to find problems with it. Unfortunately, due to the random hands being dealt, it’s very easy for one player to simply get lucky and win the game with sub-par logic, or even flawed logic. I’ve found it takes at least ten games to begin to get a clear picture of the qualities of an AI player, and more like a hundred games to be really sure. This often creates an unreasonably burden on the testing department, and introduces a very long delay in getting feedback on AI changes.

The solution is automated testing. The AI should be set up so that different variants of AI can play against each other in a very high speed set of games. You should also code a few simplistic poker AI’s into the mix, such as an AI that always goes all in, or another that simply always raises with a hand better than a pair of fives. Then you set your AI loose against these opponents, and make sure that it wins the appropriate percentage of games. If you coded your evaluation and simulation appropriately, then you should be able to simulate an entire game in about a second. (You might want to reduce the iterations of the simulation a bit to speed up testing).

The best use of your human testers is to try to get them to find an exploit of the AI, then you can codify this exploit into a temporary AI opponent to include in your test suite. You can then tweak your AI until it defeats the exploit, while still being able to defeat all the other (standard) opponents.

MORE WORK

What I’ve set out here is just a foundation for poker AI. By following the process laid out here you will get a reasonably strong and entertaining opponent. Here’s a quick list of the topics you might want to look into

Ӣ Pre-flop hand strength tables
Ӣ Opponent modeling.
Ӣ Implied Odds.
Ӣ Personality modeling
Ӣ Positional play
Ӣ Probabilistic search space
Ӣ Game theory and Nash Equilibrium.

RESOURCES:

– Sklansky, David, The Theory of Poker, 1999, Two Plus Two Publishing. – Provides various discussion of pot odds, implied odds, etc, with many heuristics that might be useful.
– The University of Alberta Computer Poker Research Group:
http://www.cs.ualberta.ca/~games/poker/ A number of research papers on implementing poker AI.
– Hold’em Killer, Evin Peretz, http://www.holdemkiller.blogspot.com/ – A blog on implementing poker AI.
– Poker-Eval, http://freshmeat.net/projects/poker-eval/ – A GPL Licensed poker hand evaluation library.

Debug and Release

Filed under: Game Development,Inner Product — Mick West @ 6:05 pm

This article originally appeared in the “Inner Product” column, Game Developer Magazine, October 2005

Introduction

Game projects usually have a number of “build configurations” , which control how the game code is compiled and linked into the game executable. Each build configuration, or build mode, builds the game with varying amounts of additional debugging code, and with the optimization options modified to aid debugging. Microsoft’s Visual Studio has by default just two: “Debug” and “Release” . The idea is that you will develop your game in Debug mode, making it easier to find bugs, and then you ship it in Release mode, with debugging code removed and optimizations switched on to make your code small and fast.

This division usually starts out fine. At the start of a game development cycle there are not too many assets in the game, level maps are small, not much of the logic is implemented and the CPU is rarely taxed. But after a few months of development, things start to get into the game. As the quantity of game assets, entities and logic approaches the level of the final game, debug mode becomes unusably slow. This leads the development team to switch to using release mode for day-to-day development work.

This situation can make bugs a lot harder to track down. The traditional release mode lacks debugging code and assertions. When the programmer attempts to reproduce the bugs in Debug mode, they first have to rebuild in Debug mode (which can take a very long time) then the code runs at a really slow frame rate, making it very difficult to reproduce the bug, and sometimes the bugs cannot be reproduced at all, due to the different configuration and initialization of memory.

I argue that the traditional division into Debug and Release is inappropriate for game development. Debug mode and release mode as traditionally envisaged should no longer be considered useful options, and should be replaced by a single build configuration “develop mode” that should be used at all stages of development.

Debug and Release mode

When you set up a project in Microsoft Visual Studio, you get two “build configurations” : Debug and Release. The distinction between these seems obvious: You use “Debug” to debug the project, and when it’s ready to ship you switch over to “Release”

This distinction is usually found in any game development project, and sometimes it’s extended to some additional configurations, like “ExtraDebug” , “Final” or “Submit” .

The intent of debug mode is to make the code easier to debug. Now we’ve become so used to having the distinction between debug and release over the years that it’s useful to take a step back and see exactly why we needed a debug mode in the first place.

A common misconception that I’d like to clear up right away is that you can’t use the debugger unless you build your code in debug mode. This is simply not true. The debugger will work just fine in release mode, but some aspects will be a bit harder to debug.

The idea behind debugging mode is to make it as easy as possible to track down bugs in your code. This results in two major differences:
1) The code is compiled in such a way that the debugger works as well as possible.
2) Extra code is compiled in, usually in the form of assertions, to trap bugs as early as possible, and to provide additional debugging information.

Optimization: In debug mode, optimization is disabled, so the code runs a lot slower. Why is this? Well, optimization involves re-ordering the sequences of assembly instructions so there is not always a direct correlation between a group of assembly instructions and a line of C++ code. So when you step through your code in the debugger, it’s not always clear exactly where you are in the code, and the PC might jump oddly between lines.

Also, optimizing involves keeping values in registers instead of memory as frequently as possible. So, local variables that are not used very much are not stored in the local stack frame. This means that in the debugger you often can’t examine the contents of a local variable in optimized code, as one you step past the code that uses it, the value no longer exists. In debug mode the local variables always have local storage for each local variable, so you can always examine their values in the debugger.

Inline expansion: Another form of optimization is the expansion of inline functions. This is done to clarify the flow of control in the debugger. If an inline function is expanded inline then you can’t step “into” it, and you can’t step “over” it. It almost becomes invisible to the debugger.

Debug Code: Besides the optimizations, you usually add additional “debugging code” to your program to help track down bugs. To this end you generally have some symbols defined that tell you at compile time which build configuration you are using, so you can conditionally compile code in for debugging.

In Microsoft visual studio these symbols are “DEBUG” which if defined when you are in debug mode, and “NDEBUG” which is defined when you are not in debug mode (or in release mode)

Assertions: Everyone should be familiar with assertions. Assertions are additional line of code that are sprinkled through the program to ensure that everything is as it should be. Basically it’s a macro that checks (asserts) that a condition that you know should be true actually is true. If the assert fails, then the program execution halts, and you can see what went wrong. Asserts should be your most useful tool in debugging your code.

Let’s have a quick look at Microsoft’s implementation of the assert macro:

#ifdef NDEBUG
#define assert(exp) ((void)0)
#else
#define assert(exp) (void)( (exp) || (_assert(#exp, __FILE__,__LINE__), 0) )
#endif /* NDEBUG */

As you can see, the assert is compiled away to nothing when you build in release mode. This makes sense, as when you release the game, you don’t want asserts going off. Plus they take up space, and all those extra checks slow down the game.

Debug and Browse information: For the debugger to work it needs to know how to link the code it is executing to the original source. This information is generated during compilation and linking and is referred to as “debug info” . In many “release” configurations the debug information is switched off. This is generally to make the project build faster, and to make the executable smaller. An executable .ELF file built with GNU C++ can be anything use to 100MB in size when built with full debug info, compared with a 3-5MB file without debug info.

Memory allocation and initialization: Memory allocation is the source of many bugs. So it makes sense to have extra debugging code in your memory allocator. Typically memory will be initialized to a known value when it is allocated. The pattern of allocations will also differ, as blocks have extra debug info added. Since most games use their own custom allocators, the differences vary. But nearly all games will have some difference in memory allocation between debug and release modes.

Uninitialized variables are a common source of error. Generally you should be catching such problems at compile time. But if not, then you need to realize that their behavior will differ in release and debug modes. In debug modes, local variables are more likely to have actual storage, and depending on your precise build configuration and compiler, they will probably be initialized to zero in debug mode. In release mode the uninitialized variable will be some random value – whatever happened to be in memory or the register used.

Game are real time applications. They have to run at a reasonable speed in order for you to say that they are working. So if the debug mode is very slow, then it’s not going to be practical to use the debug mode as the development build – the build used by artists and level designers implementing assets, and by programmers implementing new features in code or script.

However games are also incredibly complex applications, where the game engine is often still in development while the game content is being created and implemented using that game engine. If everyone is using the release mode for development then it makes it very difficult to track down the bugs that inevitably arise in a development environment.

Clearly then neither of the traditional build modes is suitable for game development. I’d like to make the case that a single hybrid mode should be used for 99% of all development. This hybrid mode (which I’ll call “Develop Mode” ) should be fast enough so that gameplay is not affected, and yet contain enough debugging features so that bugs are caught early, and easily tracked down. I’ll also make the case that develop mode should essentially be the configuration mode your game ships with.

Develop Mode

Assertions switched on. Developing without assertions is like driving with your eyes closed. You’ll know when you crashed, but you won’t know why you crashed, and your crashes will be much worse. Having assertions on all the time during development will greatly improve the rate at which you find and fix bugs.

Optimization switched on. Your code needs to be fast if develop mode is going to be used by artists and level designers. Sure, you can’t tell exactly what is going on in the debugger, you won’t be able the see the contents of local variables. But you will be still be able to identify the place where in the code the crash occurs, see the call stack and roughly follow the logic flow. If you need more information then often the solution is to add more assertions. You can add logging calls to track the contents of variables, and if all else fails you can temporarily switch on optimization.

Inline Expansion switched on. Similar to optimization, but with games the inline expansion being off is often a far greater source of slow debug code than other aspects of optimization. Most games will have some kind of custom 3D vector class, usually with accessor functions, or overloaded [] operators that use inline functions. Having these functions be explicit adds a vast overhead to code execution. The benefit you get is simpler flow of execution in the debugger, something you rarely need. So, switch inlining back on.

Link without debug information – This one can be a vast time saver. The link stage of the edit-compile-link-run cycle can take over a minute, or even several minutes, depending on the type of project. The vast majority of that time is spent in generating debug information, when really all you want is the executable. Remember the compilation units are still being complied with debug information, so if the code crashes, and you want to go into the debugger, then you can just switch debug information back on and re-link, and you’ll have the debug information, but only when you actually need it.

Make your assertions fast. Assertions should never need more than 5% of your total CPU time. If you turn assertions on and your framerate plummets, then there may be a problem in the implementation of your assertion macro (many game developers implement their own version of assert). The majority of assertions are simply comparisons of two values, and usually one of these values is something the compiler will have in a register, and the other if frequently a constant. So your assertion should compile to two or three instructions that perform the test and then skip over the code that arranges the parameters and calls the assert handler. You should verify this by looking at the compiled code in the debugger.

Use assertions appropriately. Much as I love assertions, there is such a thing as too many assertions. Assertions in very low level functions are often testing the same thing over and over again. For example, collision detection code might use unit normals stored in the mesh. Since collision code runs a lot each frame, then adding an assertion to verify that the normals were of unit length might have a serious impact on framerate. Plus you’d be repeatedly checking the same normals over and over. In this case it might be better to verify the input just once when the mesh is initially loaded, or even when it’s originally generated.

In addition, putting assertions in at such a low level of the code is often hit and miss. The conditions that might cause the code to fail could occur very infrequently. You might have to play the game for hours in order to hit the triangle with a malformed normal. Here you want to use automated tests that ensure full coverage of the code and data. These tests can be run constantly, and need not be part of the develop build.

Ideally your develop mode should also be your release mode. This automatically eliminates that bane of game development: the bugs that only show up when the game is in release mode. The problem here is that you’ve got to devote up to 5% of your CPU time, and a chunk of memory, if you want to leave in all your assertions. The solution is obviously to budget for that from the start.

This may seem like a lot of ask. The harsh reality is that game developers are often scrambling for a few thousand extra bytes, and CPU time is never adequate. But consider the benefits of having just one build configuration up to and including the version you ship. There is no risk of obscure bugs popping up due to changes in the code. If you ship for console you can get back more useful information from publisher tests. If you ship on PC, you can add a facility for users to report assertions, which will allow you to get that patch out quicker.

If you ARE going to ship without assertions, for whatever reason, then make sure you budget enough time to test that version. The majority of your testing should be done on a version with assertions in, as you’ll track down ordinary bugs much quicker. But at some point you’ll need to test your final version. Just don’t switch off the assertions the day before you submit. It’s actually might be a good idea to occasionally test with assertions removed, as the different code configuration might bring more obscure bugs to the surface.

Reference and further reading

Rabin, S. Squeezing more out of Assert. Game Programming Gems 1.
Etherton, D. Designing and Maintaining Large Cross-Platform Libraries.. Game Programming Gems 4.
Hunt, A & Thomas, D. Leave Assertions turned on. The Pragmatic Programmer. p123.

« Newer Posts

Powered by WordPress