Cowboy Programming Game Development and General Hacking by the Old West

April 23, 2008

Running in Circles

Filed under: Game Development — Mick West @ 7:03 am

(This article was originally published in slightly different form in Game Developer magazine, May 2007)

The player guides his in-game character across a footbridge. A monster appears at the other end, so the player decides to turn around and go back. Instead he walks off the side of the bridge and falls to his death. Who is at fault here? Was it the player for not mastering the controls? Was it the level designer for making the bridge too narrow? Was it the animator for making the walk stride too long? Was it the programmer who implementing the controls? Or was it the game designer for specifying the controls, bridge, and animations this way?

Desired result is not obtained....

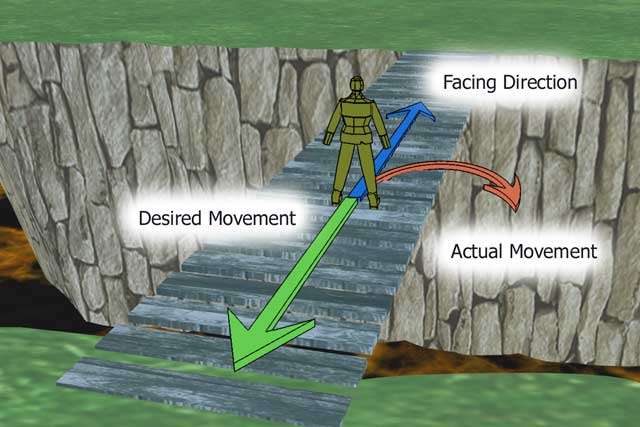
Figure 1 – The player is facing forwards along the bridge, he then indicates backwards. But because movement is constrained by the facing direction, the player runs in a circle and falls to his doom.

Well, first of all it’s not the player. They did not buy this game to enjoy mastering the tricky art of turning around on a footbridge. Secondly, assigning individual blame is not helpful. Everyone listed had a role leading up to this slight disappointment for the player, and the end result is due to the interaction of all their efforts. This article examines, mostly from a programmer perspective, how to deal with these situations, and discusses the responsibilities of the involved parties.

THIRD PERSON MOTION

The type of game we are discussing is a third person 3D action game with sections involving running or walking. This includes such games as Zelda: Twilight Princess, Grand Theft Auto, Tony Hawk, Scarface, Harry Potter, Genji, Tomb Raider, and many other big name games. In these games, you see the character on screen, generally facing away from you, with the camera looking forward at a slight downward angle. Movement is controlled by pushing the controller stick in the direction you want to go. On PC games, similar control is achieved by pushing the WASD keys in the direction you want to go, sometimes with additional control of the camera by the mouse.

Although we are talking about a 3D game, the problem is essentially two dimensional, as we are concerned with the player’s movement across the ground. Since the camera moves up and down with the player, this essentially means we are dealing with motion in the XZ plane, which we can re-term the XY plane here to match the XY coordinates of our control stick. Here directions are represented by unit vectors, which is probably the most common method, but quaternions or Euler angles might also be used.

Now the basic code here is very simple. There are three directions, the direction of the camera’s forward view vector, the direction the player is facing, and the direction the player’s controller stick is indicating (with the controller stick, or simulated with direction keys such as WASD). The programmer has to take these three directions, and convert them into information that is used to move the player across the ground relative to the camera.

The simplest way to do this is to take the stick direction and rotate it by the camera direction, and then use this new direction as a velocity vector for the player, ignoring for now the facing direction of the player. In two dimensions this is trivially involves multiplying the x and y components of the stick direction by the view direction (view.x,view.y) and by the vector perpendicular to this (view.y, -view.x). See listing 1.

Listing 1 – calculate the desired direction from the view direction and the stick direction.

desired.direction.y = stick.y * (view.x, view.y)
desired.direction.x = stick.x * (view.y, -view.x)

COMPLICATIONS

So this is very simple so far. Where is the problem? Well, the problems occur when the programmer takes this “desired” direction, and applies it to the motion of the player’s character.

What we could do is simply take the desired direction, and set the player’s velocity to this direction. This actually gives the player very accurate control over their character, with the ability to instantly change direction. However, it is not very realistic looking, as the character will instantly snap to any new direction the player indicates.

To fix this lack of realism, the programmer or designer may reason that people always walk in the direction they are facing, so logically if they are moving, they should only move along their facing vector. If the facing vector is not the same as the desired vector, then the facing vector should be rotated at a natural looking rate towards the desired vector.

This all sounds very reasonable, and in fact a large number of games implement exactly this scheme. This leads us to the small problem I mentioned at the start of the article. The problem is that the player’s character walks in a circle. There are three reasons why this is a problem.

Firstly there is a disconnect between the player’s intentions and what actually happens. The player has indicated a desired direction. For the player they are not always indicating a direction in which they want their character to be facing, but instead they frequently want to walk towards a specific point in the world. Instead, their character will turn, walking forwards along the facing direction until the facing direction is parallel with the desired direction. The character walks in a circle, and will end up perhaps six virtual feet to one side of the desired path. The player now has to correct their direction again to point towards where they were indicating in the first place. Even worse, this inadvertent movement to the side of the path may put them in danger, perhaps dropping them off the side of a bridge (see figure 1, above).

Secondly, it introduces ambiguity. If the player’s character is facing in one direction the and player moves the stick to indicate 180 degrees in the other direction, then due to the various imprecisions, the character might do their six foot circle to the left or the right, with no feedback as to exactly why this direction was chosen. You can demonstrate this in many games by simply attempting to walk back and forth between two specific points, or along a line. Notice the lack of control, and the random nature of the turns.

Thirdly, despite the underly motivation for implementing it this way, it is actually NOT realistic. Try an experiment: get up and stand ten feet away from your chair, with your back to the chair. Then walk back to the chair. Try it now. Did you walk in a six foot circle and then correct your heading? No, you simply turned around, initially either by moving one foot backwards and turning it outwards 90 degrees and moving the other foot over it, or you moved one foot over the other about 45 degrees to the side then moved the other one to face backwards.

Try some more experiments to contrast what happens in real life with what happens in various video games. Walk back and forth along a line. Walk between two points. Run to a point and back. Humans do not walk in circles at constant velocity unless they are following a path. When a human makes a decision to change direction, they do this abruptly, leaning and pushing with a leg to very rapidly pivot their direction of travel. When the player quickly pushes the stick in a new direction, they want their character to move in that direction, just like in real life. This is one of the times in a video game where more physical realism is a good thing.

CIRCULAR THINKING

Why does this problem arise? The answer could be that the game developers put the game together rather quickly and did not have time to improve the controls. That excuse might be valid for a little casual game developed over a couple of months, but what of much more expensive mainstream games that cost millions of dollars to make and are in development well over a year? How did they end up with this inaccurate, ambiguous and unrealistic player control?

The answer is complex, and will vary from game to game. But the bottom line is that player control is often a shared responsibility and the problem arises through a lack of clear communication regarding what is actually wanted from each person. The game design document probably did not specifically address this issue. There was probably a diagram showing that the player would control their direction of motion in a camera relative manner with the left analog stick, or the WASD keys. But there is no detail beyond that.

Then the programmer and the animator come into the picture. The animator will supply idle, walk and run animations. The programmer implements code that matches the animation to the movement of the character. The animator is insistent that there is to be no sliding, that the character’s feet stay firmly planted on the ground during the walk cycle. Since turning on the spot in the walk animation results in sliding, the animator and programmer decide the way to solve this is to have the character always move along the forward facing vector, thus keeping the footsteps synced with the movement.

Perhaps instead the programmers come up with a very powerful scheme whereby the animators can fine tune the movement and rotation for each animation, and the designers can implement movement by playing the animations. The designers get various turn animations, including turning on the spot. But despite the power of this system it requires additional programming to actually implement swift turns for every situation, and the player is often left with ambiguous controls.

LETTING IT SLIDE

Why don’t the designers and producers, and the testers, and even the players, notice these problems? Why are they not addressed?

Different people involved have different goals. The programmer wants to implement the specification given to him and make it bug free and efficient. The animation wants her animations to look good. The game designer is concerned with a large number of issues. The testers have their hands full looking for bugs. The end users, who have paid for the game, have enough invested in the game to keep playing long enough to get used to the clunky controls. They learn to correct their heading after turning around. They learn to turn around very slowly if within six feet of danger. They get used to their characters running around in little circles and figure eights.

But inaccurate and ambiguous controls suck the life out of a game. The disconnect between intentions and actions prevents the player from becoming fully engaged in the flow of the game. The constant annoyances of unintended actions add up over time and contribute greatly to the tipping point where the player, consciously or unconsciously, decides a game is not worth playing any more, and hence neither is the sequel, and nor will they recommend it to their friends.

PROGRAMMER RESPONSIBILITIES

What is the responsibility of the programmer here? I mentioned before that the causes of this problem are often shared. But the programmer is often in a unique position to do something about it. The control programmer has the deepest understand of what is actually going on at the frame to frame level in the code. The programmer understands the interaction between the view direction, the stick direction, the facing direction and the desired direction. The programmer should know exactly how the animation system ties into the movement of the character, in relation to these four directions.

The programmer’s responsibilities here are to communicate this understanding to the other members of the team in a way that allows them to deal with the issues in a timely manner. The producers and the designers have the responsibility of making sure that the programmer does this.

Programmers sometimes work as is their only task is to implement the feature requests of the designers and technical directors. Programmers get a list of features, and they implement those features one at a time, tick them off and go home happy. But games are complex systems. When you implement a feature you are adding to the complexity of the system, and other features will inadvertently arise. When you implement the “walk along the forward direction, turning it towards the desired direction”, you are also implementing the “walk in circles” feature and the “make it difficult to walk to a point behind you” feature.

If a programmer is a step removed from the implementation of player control, then the situation is even worse. The programmer has created some system of defining player control with data or scripts, and handed it off to a designer. The designer may simply implement the “walk in circles” method simply because that is the only option. Here the programmer’s responsibility is to continue to be available to explain and update the system after it has been implemented to the initial specification. The producer needs to allot time for improvements to the system for many months after it is initially implemented.

CONCLUSIONS

I’ve kept this discussion as simple as possible, and as non-technical as possible. In reality the problem is really quite simple, and the solutions are simple. But time after time games are released with this problem.

The walking in circle problem is just one of many similar problems that crop up again and again. Players get stuck against lampposts, cameras snap oddly, players jump at the right time but still fall off the cliff, pressing a button a millisecond too early means the attack does not happen or you can’t turn for a fraction of a second after an attack. I could list player control problems like this forever.

Players are frustrated by these problems. But they keep playing the game, and work around them. To a similar extent so do the game designers. The reason being that they don’t really understand what is going on within the code, and so are unclear as to the causes of the problem, and even perhaps don’t really appreciate that there is a problem, since they cannot see how it might be addressed. Or perhaps they see the problem, but their “solution” is to make the bridge wider.

This is where the role of the programmer is of utmost importance. The programmer needs to communicate the way things work in a clear and concise manner that allows the designers to both appreciate the causes of the problem, and to find a solution. The programmer is also in a unique position to actually detect problems with the control implementation.

Players are very adaptable. They will work around a problem so intuitively that they will not perceive that there actually IS a problem. Instead they perceive a vague quality problem. The controls “don’t feel right” or they are “sloppy”. They can’t say what the problem it. But the programmer, with his unique insights into what is going on under the hood, at the state level, at the vector level, and at the millisecond level, should be able to see these problems, and it is his responsibility to raise them as issues, and to suggest and implement solutions.
April 1, 2008

Practical Fluid Mechanics

Filed under: Game Development,Inner Product — Mick West @ 1:57 pm

(This article originally appeared in two parts in Game Developer Magazine, March and April, 2007) Fluid effects such as rising smoke and turbulent water flow are everywhere in nature, but are seldom implemented convincingly in computer games. The simulation of fluids (which covers both liquids and gasses) is computationally very expensive. It is also mentally very expensive, with even introductory papers on the subject relying on the reader having math skills at least at the undergraduate calculus level.

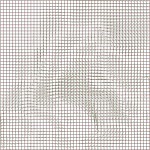
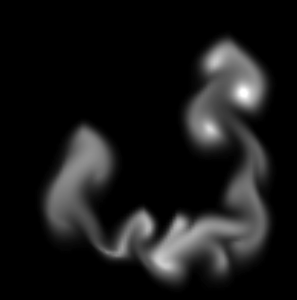
In this article I will attempt to address both these problems from the perspective of a game programmer not necessarily conversant with vector calculus. I’ll explain how certain fluid effects work without using advanced equations and without too much new terminology. I shall also describe one way of implementing the simulation of fluids in an efficient manner without the expensive iterative diffusion and projection steps found in other implementations. A working demonstration with source accompanies this article and can be downloaded from here, example output from this can be seen in figure 1.

Figure 1 - Sample Output

GRIDS OR PARTICLES?

There are several ways of simulating the motion of fluids. These generally divide into two common types of methods: grids methods and particle methods. In grid methods, the fluid is represented by dividing up the space a fluid might occupy into individual cells, and storing how much of the fluid is in each cell. In particle methods the fluid is modeled as a large number of particles that each move around and react to collision with the environment and interacting with nearby particles. Here I’m going to concentrate on simulating fluids with grids.

It is simplest to discuss the grid methods with respect to a regular two-dimensional grid, although the techniques apply equally well to three dimensions. At the simplest level, to simulate fluid in the space covered by a grid you need two grids, one to store the density of liquid or gas at each point, and another to store the velocity of the fluid. Figure 2 shows a representation of this, with each point having a velocity vector, and also containing a density value (not shown). The actual implementation of these grids in C/C++ is most efficiently done as one dimensional arrays. The amount of fluid in each cell is represented as a float. The velocity grid (also referred to as a velocity field, or vector field) could be represented as an array of 2D vectors, but for coding simplicity it is best represented as two separate arrays of floats, one for x and one for y.

In addition to these two grids we can have any number of other matching grids that store various attributes. Again each will be stored as matching array of floats, and can store things such as the temperature of the fluid at each point, or the color of the fluid (whereby you can mix multiple fluids together). You can also store more esoteric quantities such as humidity, for if you were simulating steam or cloud formation.

ADVECTION

The fundamental operation in grid based fluid dynamics is advection. Advection is basically moving things around on the grid, but more specifically it’s moving the quantities stored in one array by the movement vectors stored in the velocity arrays. It’s quite simple to understand what is going on here if you think of each point on the grid as being an individual particle, with some attribute (the density) and a velocity.

You are probably familiar with the process of moving a particle by adding the velocity vector to the position vector. On the grid, however, the possible positions are fixed, so all we can do is move (advect) the quantity (the density) from one grid point to another. In addition to advecting the density value, we also need to advect all the other quantities associated with the point. This would obviously include additional attributes such as temperature and color, but also includes the velocity of the point itself. The process of moving a velocity field over itself is referred to as self-advection.

The grid does not represent a series of discreet quantities, density or otherwise, it actually represents (inaccurately) a smooth surface, with the grid points just being sampled points on that surface. Think of the points as being X,Y vertices of a 3D surface, with the density field being the Z height. Thus you can pick any X and Y position on the mesh, and find the Z value at that point by interpolating between the closest four points. Similarly while advecting a value across the grid the destination point will not fall directly on a grid point, and you will have to interpolate your value into the four grid points closest to the target position.

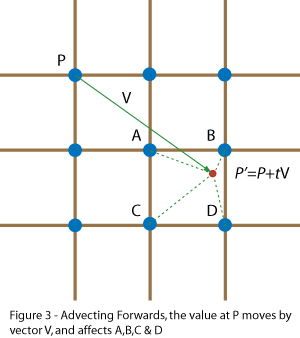
In figure 3, the point at P has a velocity V, which, after a time step of dt, will put it in position P’ = P + dt*V. This point falls between the points A, B, C and D, and so a bit of P has to go into each of them. Generally dt*V will be significantly smaller than the width of a cell, so one of the points A,B,C or D will be P itself. Advecting the entire grid like this sufferers from various inaccuracies, particularly that quantities dissipate when moving in a non-axis-axis-aligned direction. This inaccuracy can actually be turned to our advantage.

STAM’S ADVECTION

Programmers looking into grid based fluid dynamics for the first time will most often come across the work of Jos Stam and Ron Fedkiw, particularly Stam’s paper “Real-Time Fluid Dynamics for Games“, presented at the 2003 Game Developer Conference. In this paper Stam presents a very short implementation of a grid based fluid simulator. In particular he describes implementing the advection step using what he terms a “linear backtrace”, which simply means instead of moving the point forward in space, we invert the velocity and find the source point in the opposite direction, essentially back in time. We then take the interpolated density value from that source (which, again, will lay between four actual grid points), and then move this value into the point P. See figure 4.

Stam’s approach produces visually pleasing results, yet suffers from a number of problems. Firstly the specific collection of techniques discussed may be covered by U.S. patent #6,266,071, although as Stam notes, the approach of backtracing dates back to 1952. Check with your lawyer if this is a concern to you. On a more practical note the advection alone as described by Stam simply does not work accurately unless the velocity field is smooth in a way termed mass conserving, or incompressible.

Consider the case of a vector field where all the velocities are zero except for one. In this situation the velocity cannot move (advect) forward through the field, since there is nothing ahead of it to “pull” it forward, instead the velocity simply bleeds backwards. The resultant velocity field will terminate at the original point, and any quantities moving through this field will end up there. This problem is solved by adding a step to the algorithm termed projection, which is basically smoothes out the velocity by making it incompressible, thus allowing the backtracing advection to work perfectly, and making the paths formed by the velocity be “swirly”, as would be the case in real water.

The problem with this approach is that projection is quite expensive, requiring 20 iterations over the velocity field in order to “relax” it to a usable state. Another performance problem with Stam’s approach is that there is a diffusion step, which also involves 20 iterations over a field. This is needed to allow the gas to spread out from areas of high density to areas of low density. If the diffusion step were missing, solid blocks of the fluid would remain solid as them moved over the velocity field. The diffusion is an important cosmetic step in the process.

ACCOUNTING ADVECTION

If a velocity field is not mass conserving, then this means that some points will have multiple velocity vectors from other points pointing towards them. This means that if we simply move our scalar quantities (like density) along these vectors, then there will be multiple quantities going to (or coming from) the same point, and the result will be a net loss or gain of the scalar quantity. So if the total amount of something such as the density would either fade to zero or gradually (or perhaps explosively) increase.

The usual solution to this problem is to make sure the vector field is incompressible and mass conserving. But as mentioned before, this is computationally expensive. One partial solution is to make the advection step mass conserving, regardless of if the velocity field actually is mass conserving. The basis of this solution is to always account for any movement of a quantity by subtracting in one place what is added in another. Advection uses a source and destination buffer to keep it independent of update order. In Stam’s implementation, the destination buffer is simply filled one cell at a time by combining a value from four cells in the source buffer, and placing this value into the destination buffer.

To properly account for compressible motion, we need to change this copying to accumulating, and initially make the destination buffer a copy of the source buffer, and as we move quantities from one place to another we can subtract them in the source and add them in the destination. With the forward advection in figure 3, we are moving a quantity from point P to points A,B,C and D. To account for this we simply subtract the original source value in P from the destination value in P, and then add it (interpolated appropriately), to A,B,C,D. The net change on the destination buffer is zero. With the reverse advection in figure 4, as used by Stam, the solution would initially seem to be symmetrically the same: just subtract the interpolated source values in E,F,G and H from the destination buffer, and add them to P.

While this works fine for signed quantities such as velocity, the problem here is that quantities such as density are positive values. They cannot go below zero as you cannot have a negative quantity of a liquid. Suppose that point E was one source point for two destinations P1 and P2, both of which wanted 0.8 of E. Now, if we follow our initial plan and subtract 0.8*E from E and add 0.8*E to both P1 and P2, the net effect is zero, but now the value at E is negative. If we clamp E to zero then there is a net gain of 0.6*E. If we subtract 0.8*E from the source value of E after updating P1, then when we update P2 it will only get 0.8*0.2*E, when clearly both P1 and P2 should both get equal amounts, and intuitively here it seems they should both get 0.5*E, and the resulting value in E should be zero, leading to a net zero change.

To achieve this result I first create a list that for each point records the four points that are sources for that point, and the fraction of each point they want. Simultaneously I accumulate the fractions asked of each source point. In an ideal world, this would add up to one, as the entire value is being moved somewhere (including partially back where it started). But with our compressible field the amount of the value in each point that is being moved can be greater than or less than one. If the total fraction required is greater than one, then we can simply scale all the requested fraction by this value, which means the total will be one. If less than one, then the requesting points can have the full amount requested. We should not scale in this case as it will lead to significant errors.

With the mass conservation of advection fully accounted for in both directions, it turns out that neither forward or backward linear advection alone will produce smooth results. After some experimentation I determined that applying forward advection followed by backward advection worked very well, and give a very smooth and artifact free flow of fluid over a compressible velocity field.

NOW WHAT?

So, we can now perform both forward and reverse advection in a mass-conserving manner, meaning we can move fluid around its own velocity field. But even though our velocity field does not need to be mass-conserving, we actually still want it to be, since the velocity fields of real world fluids generally are incompressible. Stam solves this problem by expensively forcing the field to be fully mass conserving after every change. This is necessary, since the reverse advection requires it. The key difference now is that since our advection step does not require the field to be mass-conserving, we are really only doing it for cosmetic purposes. To that end, any method that rapidly approaches that state over several time-steps will suit our purpose. That method, and the method of diffusion, can be found in the accompanying code, and are discussed below.

PRACTICAL FLUID DYNAMICS: PART 2

In last month’s article (above) I gave an overview of the nuts and bolts behind simple two dimensional fluid dynamics using a grid system. This month I’ll expand upon this, explaining how we can achieve a reasonable level of realism without too many expensive iterations. I’ll also continue with my goal of explaining how everything works by using no math beyond basic algebra.

50 x 50 velocity field, click to view full sizeTo recap so far: we have a velocity field which is an array of cells, each of which stores the velocity at a particular point (click example on the right). Remember this a continuous field, and we can get the velocity at any point on the field surface (or in the field volume for 3D), by interpolating between the nearest points on the field. We also have a matching field of density. The density field represents how much of the fluid or gas is in a particular grid cell. Again this a continuous field, and you can get a density value for any point in the simulated space by interpolating. I then described the process of advection, which is the moving of the values in one field (say the density field), over the velocity field.

I described both forward advection and reverse advection, where the quantities in the field are respectively pushed out of a cell, or pulled into a cell by the velocity at that cell. I noted that the advection process worked well if you perform forward advection and then follow it with reverse advection.

INCOMPRESSIBLE FIELDS

I noted that reverse advection in particular would only work if the velocity field was in a state termed incompressible. But what does this mean? Well, you might have heard that “water is incompressible”, meaning you can’t squeeze water into a smaller volume than it already occupies. Compare this with gasses such as air, where you can clearly be compressed. Picture, for example, a diver’s air tank. The tank contains a lot more air than the volume occupied by the tank. But if you were to take that tank, and fill it with water, and then somehow push in another pint of water, then the tank would explode.

Water, in fact, is actually compressible, very slightly, since it’s physically impossible to have a truly incompressible form of matter. The incompressibility of a material is measured by a metric called a “bulk modulus”, For air this is about 142,000 whereas for water, it’s 2,200,000,000 or approximately 15,000 times as much. By comparison, the least compressible substance known to humankind, aggregated diamond nanorods, are just 500 times more incompressible than water.

So for most practical purposes, you can imagine water as being incompressible. So, with water being considered incompressible, then when considering a solid volume of water, there can not be more water in one cell than in another. So, if we start out with an equal amount of water in each cell, then after moving the water along the velocity field (advecting), we can’t increase or decrease the amount of water in each cell. If this happens, then the velocity field is incompressible or mass conserving.

PRESSURE

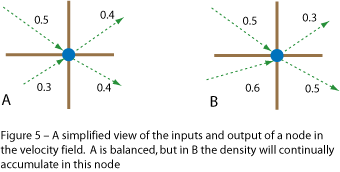
You can think of the pressure at a particular node as being the difference in density between a cell and its neighbors. Now with water being incompressible, the pressure is going to be the same throughout the density field. If we think of a node as having a series of inputs and outputs during the advection process, then in an incompressible field, the sum of input is equal to the sum of outputs (Figure 5a). When we move the water along its incompressible velocity field, then the density at each node will remain constant, and hence the pressure will remain constant.

On the other hand, if the velocity field happens to be structured in such a way that for some cells more is going into them then is coming out, then the velocity field is compressible (Figure 5b). When the density of the fluid is advected across a compressible velocity field, then the density in individual cells will increase or decrease. If we simply keep advecting the density, then the density will eventually all be compressed into the cells of the velocity field that have a net gain of input over output.

If we were not performing accounting in our advection step (as explained last month), then there would be an overall net loss in density (the field is not mass conserving). Stepping back from our abstraction for a second, what prevents this from happening in real-life? Well, obviously if more of a fluid flows into a cell than is flowing out, then the density of that cell increases relative to its neighbors, and hence the pressure in that cell increases. High pressure in a cell creates an acceleration force on the neighboring cells, increasing their velocity away from that cell, hence increasing the outflow rate from the cell, and evening out the imbalance. As with the atmosphere, fluid flows from an area of high pressure to an area of low pressure.

APPLYING PRESSURE

Listing 1 shows the code for applying pressure. Here mp_p0 is the array that stores the density (which is equivalent to the pressure, so I actually refer to it as pressure in the code). The arrays mp_xv1 and mp_yv1 store the x and y components of the velocity field. The function Cell(x,y) returns a cell index for a given set of x and y coordinates. The loop simply iterates over all horizontal and vertical pairs of cells, finds the difference in pressure, scales it by a constant (also scaled by time) and adds it to both cells.

The logic here is slightly unintuitive, since physics programmers are used to the Newtonian principle that every action has an equal an opposite reaction, yet here when we add a force, there is no opposing force, and we don’t subtract a force from anywhere else. The reason is clear if you consider what is actually going on. We are not dealing with Newtonian mechanics. The force actual comes from the kinetic energy of the molecules of the fluid which are actually randomly traveling in all directions (assuming the fluid is above absolute zero), and the change to the velocity field actually happens evenly across the gradient between the two points, so in effect we are applying the resultant force from a pressure gradient to the area it covers, which here is two cells, and we divide it between them.

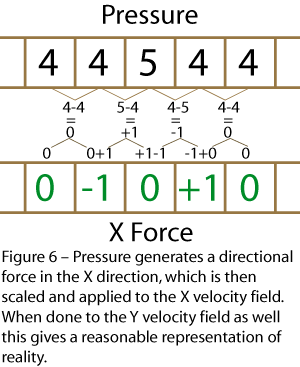
Here’s an example, just looking in the x direction, we have a flat pressure field, with one cell denser that the rest. The cell densities are 4,4,5,4,4. The gradients between the four pairs of cells is 0,-1,+1,0 Adding this to each cell (ignoring scaling), we get: 0,-1,0,+1,0. See Figure 6.

Here the cells on either side of the high pressure cell end up with a velocity pointing away from that cell. Consider now what will happen with the advection step, the reverse advection combined with forward advection will move the high pressure cell outwards, reducing the pressure, and reducing the force. The fluid moves from an area of high pressure to an area of low pressure.

Effectively this makes the velocity field tend towards being incompressible and mass conserving. If there is a region that is increasing in density, then the resultant increase in pressure will turn the velocity field away from that area, and hence decrease the density in that area. Eventually the velocity field will either become mass conserving (mass just circulating without density change), or it will stop (become zero).

Listing 1 – The pressure differential between two cells creates an identical force on both cells

for (int x = 0; x < m_w-1; x++) {
for (int y = 0; y < m_h-1; y++) {
int cell = Cell(x,y);
float force_x =  mp_p0[cell] - mp_p0[cell+1];
float force_y =  mp_p0[cell] - mp_p0[cell+m_w];
mp_xv1[cell]     +=  a * force_x;
mp_xv1[cell+1]   +=  a * force_x;
mp_yv1[cell]     +=  a * force_y;
mp_yv1[cell+m_w] +=  a * force_y;
}

INK AND SMOKE

What we are modeling here is motion within a fluid (such as air swirling around inside a room), and not the overall motion of a volume of water, (such as water sloshing around a cup. This method, as it stands, does not simulate the surface of the fluid. As such, visualizing the fluid itself is not very interesting, since a room full of air looks pretty much the same regardless of how the air is moving. Where it become interesting is when we introduce some substance into the fluid that is suspended by that fluid, and carried around by the fluid.

In water this could be silt, sand ink, or bubbles. In air, it could be dust, steam, or smoke. You can even use the velocity field techniques outlined here to move larger object such as leaves or paper in a highly realistic manner. Note it’s important that what we are talking about is a suspension of one substance in another. We are generally not so interested in simulating two fluids that do not mix (like oil and water).

Games have things that burn and explode, so smoke is a very common graphical effect. Smoke is not a gas, but a suspension of tiny particles in the air. These tiny particles are carried around by the air, and they comprise a very small percentage of the volume occupied by the air. So we do not need to be concerned about smoke displacing air.

In order to simulate smoke, we simply add another advected density field matching, where the value at each cell represents the density of smoke in that region. In the code this is referred to as “ink”. This is similar to the density of air, except the density of smoke or ink is more of a purely visual thing, and does not affect the velocity field.

HEATING THINGS UP

One final ingredient that often goes along with a fluid system like this is the heat of the fluid/gas at each location. Sources of smoke are usually hot, which heats up the air the smoke initially occupies. This causes the smoke to rise. It rises because higher temperatures mean more energy, which means the fluid molecules are moving faster, which means higher pressure, which means lower density (remember density is only proportional to pressure at constant temperature), which makes the hot air rise.

Now, that’s a complex sequence of events, but it’s initially simpler to just model the result, “hot air rises”, and have the relative temperature of a cell create a proportionate upwards force on the velocity field at that cell. We can do this trivially by adding a scaled copy of the heat field to the Y velocity field. Similarly, rather than attempt to model the effects of heat in the initial phases of a simulation, I found it easier to simply model the expected results.

So, although a flame creates heat which makes the smoke rise, more pleasing results were found by “manually” giving the volume of air around the flame an initial upwards velocity, and then letting the heat take it from there. With more complex systems such as an explosion, the fiddly physics happens in the first tenth of a second, so you can just skip over that and set up something that looks visually pleasing with our simplified physics.

FILTERING THINGS OUT

The simplistic application of forces we perform for acceleration due to pressure (Figure 2) has the tendency to introduce artifacts into the system. These typically present as unnatural looking ripples. The way these are dealt with is to smooth out the velocity and pressure fields by applying a simple diffusion filter. If you use the Stam style reverse advection with projection, then you have to use a computationally intensive filter iterating several time. But with the inherent diffusion of forward advection, combined with the accuracy of the combined forward and backwards accounted advection, we can get away with a single iteration.

It’s often difficult to see exactly what effect a change can have on a fluid system such as this. The fluid is very complex looking, and small changes to parameters often have an effect that is not immediately obvious. The ideal way to solve this problem is to set up your system so you can run two copies of the same system in parallel, with one having the modified parameters. The difference can then become obvious. Figure 7 (below) shows such an A/B comparison. The image on the left has no diffusion filtering, and the image on the right has a single pass of diffusion filtering applied every update.

FLUID IDEAS

I’ve glossed over a few other important aspects here, but details of these aspects can be found in the accompanying code. You need to pay particular attention to how you handle the cells that are at the edge of the system, as the differing number of neighbors has a significant effect. At the edges of a system you have the option of either reflecting, wrapping or zeroing values, depending on what you want. By wrapping in one direction you essentially get a tiling animated texture in that direction, which could be used as a diffusion or displacement map for the surface of a moving stream of fluid .

There is also the issue of friction. Motion in a fluid is generally quite viscous. This can be implemented as a simple friction force that applies to the velocity field. If there is no friction in the fluid it can slosh around forever, which is generally not what you want. Different viscosity setting give very different visual results. There are a very large number of variables that can be tweaked to give radically difference visual effects, even in my rather simple implementation. It’s worthwhile spending some time just playing with these values just to see what happens.

Additional resources

3D Version

This approach has also been implemented in 3D by Quentin Froemke, et al, at Intel, as part of their research into Multi Threaded programming.

http://www.gamasutra.com/view/feature/4022/sponsored_feature_multithreaded_.php

Powered by WordPress