This article originally appeared in Game Developer Magazine, May 2005.
Button Disambiguation: How to make your game feel more responsive and intuitive by measuring and intelligently resolving ambiguous player control
Introduction
PushingButtons.zip
158K
Have you ever been playing a game, and you pressed a button to make your character do something, and the character either did something else, or simply did nothing at all?
More to the point, if you are responsible for the design or implementation of the player control in a game, have you ever had someone come to you and tell you it’s broken, or worse: “it doesn’t feel right“ yet when you try it yourself, it seems fine to you. Is it in their imagination?
A core aspect of programming a game is converting the player’s input from the gamepad buttons into the character’s actions. On the face of it this appears a simple problem: you just map buttons to events. However due to the non-precise way that different players press buttons and perceive events, problems of ambiguity arise which lead to frustration and a feeling of unresponsiveness. The player thinks he has hit the correct button at the correct time, but, as he’s not a robot, the intent of his input is ambiguous and cannot be resolved satisfactorily with a simple mapping.
This article discusses the physical and perceptual reasons for this ambiguity, discusses how different people produce different input, describes methods for analyzing what is actually occurring, and presents a strategy for resolving input ambiguity that allows your game to feel responsive and intuitive.
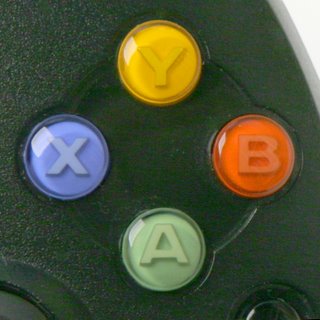
On a typical gamepad such as the standard pads used with the Sony Playstation and the Microsoft Xbox, there are four buttons that are all operated by the player’s right thumb. In this article I’m going to concentrate mainly on the use of these four buttons.
One of these buttons is the primary button, which is used to trigger the primary action in the game. In platform games such as Mario, this is Jump. This button is X on Sony Dualshock, where it is the bottom button of the group of four. The primary button is A on Xbox, in a similar configuration to the Sony Dualshock.
For the purposes of the article I’m going to be referring to the buttons as laid out on the X-Box. Mostly because I can refer to each button by a letter (A,B,X or Y) and the diamond shaped layout is the most common. (see Figure 1)
Mapping player input to game events
The mapping of player input to events can be done in a number of ways, but basically, it boils down to a set of rules. Each game event (such as jumping) must satisfy a number of conditions before it can be triggered. This can be expressed in pseudocode as:
If (conditions met) then (trigger event)
I am going to use two examples here, both based on a simple Mario style platform game.
Example #1: Jumping
Let’s say our primary button (A) is the jump button. The rule could be:
If Button A pressed then JUMP
But you don’t want to jump while you are in the air, so a more reasonable rule would be:
If Button A pressed and ON GROUND then JUMP
Example #2: Super Jump and Ground Pound
This is two moves performed with the same buttons. In our game, pressing the right shoulder button (R1) causes the character to crouch. Pressing A while crouched will cause the character to do a super high jump.
If you press R1 while in the air, the character will do a ground pound where they rapidly slam down into the ground. Both these moves are similar to moves in Super Mario 64.
This can be expressed as three rules:
If button R1 pressed and ON GROUND then CROUCH
If button R1 pressed and IN AIR then GROUND POUND
If button A pressed and CROUCHED then SUPER JUMP
This seems nice and straightforward. However there are numerous problems with this simple implementation. As we will see later, getting player control to work is inevitably a fiddly and complex task. In order to provide a feeling of simple intuitive control to the player you will actually have to write some rather convoluted ad hoc code.
Detecting and Recording player input
The simplest way of handling input from a joystick is to query its current state. i.e. is button X pressed right now.
This works fine for things such as acceleration and braking, which are continuous events. But for one-time events, such as jumping and shooting, you actually want to detect when the player initially presses the button. You need to respond when a button goes from “released” to “pressed” – i.e., when the button is “triggered” .
In addition, you often want to know how long a button has been pressed, and sometimes how long since a “trigger” event has occurred. You might also want to be able to flag the “trigger” event as having been handled, so it does not get continually re-used.
So, for the purposes of this article, I’m going to assume a fairly simple implementation of a joypad button interface that provides the information listed above. This is also what I’ve implemented in the sample code.
Thumb positioning – Precise Thumb vs. Sloppy Thumb
On the vast majority of games, the player rarely moves his thumb from the vicinity of these four buttons, so even when not pressing a button, they will rest their thumb over the buttons, ready to press them as needed.
There are two basic ways in which a person can hold their thumb over the buttons. I call these Precise Thumb and Sloppy Thumb. As we shall see, it is important to consider both types of thumb positioning when designing and implementing your control scheme.
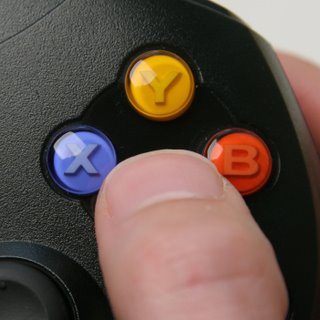
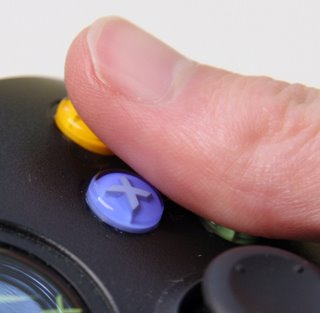
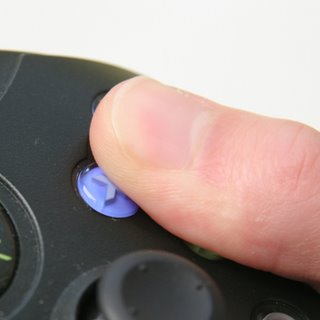
Precise Thumb is where the player uses the tip of his thumb to press each of the four buttons. When moving from one button to another, the precise thumb player will lift his thumb off the button, and press it down on another button. (Figure 2a)
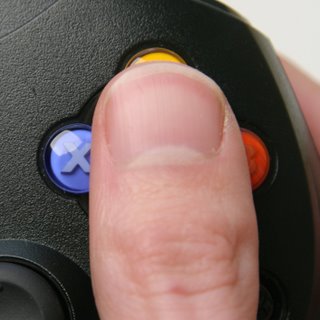
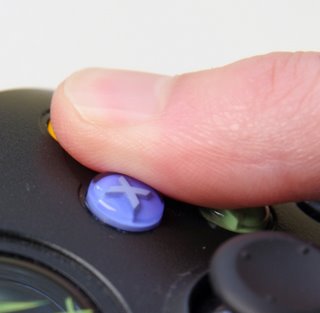
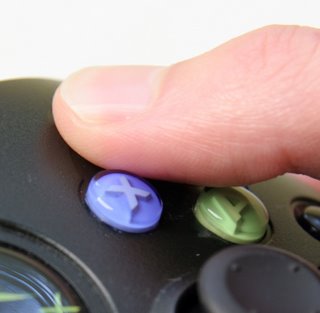
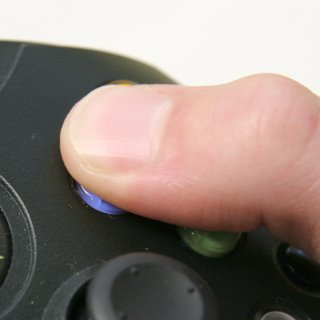
Sloppy Thumb is where the player uses the whole thumb to operate the four buttons. There are many variants, but basically the sloppy player uses the thumb tip only to operate the uppermost button. The buttons to the sides are operated by the sides of the thumb, and the lower button is operated by either the middle of the thumb pad, or the bone at the first joint in the thumb. (Figure 2b)
In order to press a different button, the sloppy player will usually just tilt his thumb.
The Nintendo Gamecube controller is built around the expectation that the player will use some kind of “sloppy thumb” technique. There is a large central primary button, and with the three other buttons surrounding it, encouraging you to keep your thumb squarely over the primary button, and hit the other buttons with the edges and the tip of your thumb.
This radical difference in thumb position (and button layout) can lead to perceived control problems that only arise on one platform and with just one tester. But remember one tester out of your pool of testers could equate to many thousands of player having the same problem if you are making a reasonably popular game. If you have very few testers, then if someone comes to you and says “it feels wrong when I do this” , then pay close attention, because they represent a goodly chunk of your potential audience.
The Causes of Ambiguity
Ambiguity cause #1 – Imperceptible State Changes.
The player runs his character towards the chasm. When he gets to the edge, he presses the jump button. The character does not jump, and instead plunges to his doom.
Why did the character not jump? Because in the internal model of reality that the game stores, the character had already run off the edge of the cliff when they pressed the jump button. However, to the player it looked like he was right at the edge and a jump looked perfectly possible. There was a discrepancy between the perceptions of the time at which the player left the ground.
On one frame (on the ground) pressing button A will make the character jump. On the next frame (in the air) pressing A will have no effect. To the player these two frames of the game (just 0.016 seconds apart) appear identical.
This problem also occurs when jumping just before landing, or just before hitting a wall (for a wall jump)
Ambiguity Cause #2 – Change in button function based on state.
In Nintendo’s Super Mario 64 DS, when playing as Mario, pressing A to jump then R1 (R1 = Right shoulder button, use the Z button on the Nintendo 64 version), will trigger a ground pound. Pressing R1 then A will trigger a backflip. Pressing them both at the same time will cause one of: a ground pound, a backflip, or a normal jump, seemingly at random. This is bad because the user has no control; they are doing the same thing over and over, yet getting different results.
This problem also shows up in Mario when you try to do a long jump, which is done by running, then jumping by pressing A+R1. Sometimes while attempting this you will do a Ground Pound by accident. This is not the fault of the player. To the player it appeared they did everything right, but the results were not what they expected.
Now at this point you might think “hey, I’m pretty good at Mario, I don’t notice those problems, I can long jump no problem” . Sure, but to get good at it you had to train yourself to work around these control issues. You had to learn that to do a consistent long jump you had to tap R1 and between 0.05 and 0.18 seconds later tap A. This you learn by failing repeatedly when you first play the game until you get it right.
To the beginning player this is not fun. Controls that do not do what you want are frustrating. Just as bad are inconsistent controls, where sometimes the character does one thing, and sometime another, without any logic perceptible to the player. They might not be able to voice it exactly, but the game “just feels wrong” . Ignore this at your peril.
Ambiguity Cause #3 – Accidental button presses with Sloppy Thumb
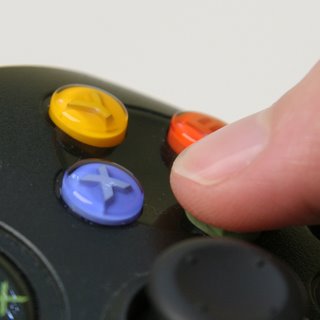
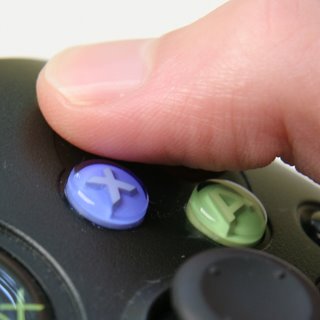
When moving his thumb from one button to another when using the Sloppy Thumb technique, it’s quite likely that you may hit some other button by mistake. Particularly when going between opposite buttons
For example, when going from A to Y the “precise thumb” player will lift their thumb off A and then press Y (Figure 3) in a nice clean motion. The sloppy player will tilt their thumb forward, rocking it from A to Y and quite possibly momentarily pressing X or B. (Figure 4)
Ambiguity Cause #4 – Release and Press vs. Press and Release
It’s common in games for an action to involve releasing one button, and then pressing another in rapid succession.
This can happen in two ways. Say when moving from A to X. The precise thumb player Releases X, then Presses A (figure 5) whereas the sloppy player will Press A, then release X, so for a brief period of time, A and X are both pressed.(figure 6)
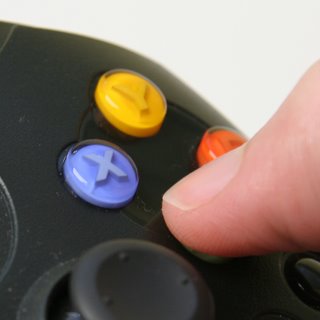
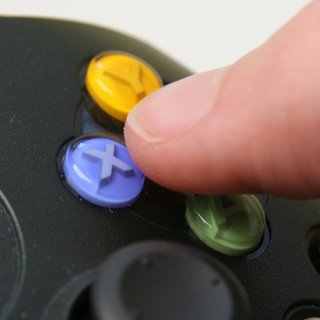
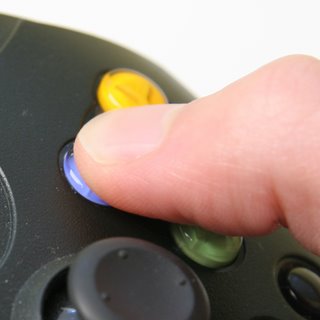
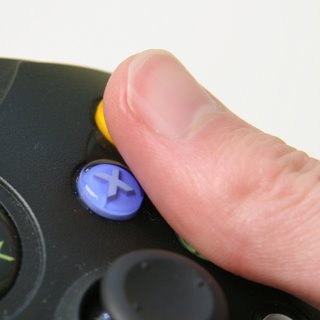
This can lead to problems if you have an event triggered by A+X being held. Or if your event tied to X relies on no other buttons being pressed.
Measuring Ambiguity
In dealing with all these problems, the most important tool is one that gives you the ability to see exactly what is happening, and more importantly “what just happened” . People are going to show you control problems, and you are going to have to figure out the precise sequence of events that caused that problem to occur.
The first thing to implement is a simple log file. Every time an event of interest occurs, you just print out that event, along with the time and any other useful information. Then when the control problem crops up, you just look at the log file and see what caused the problem.
In the example game I’m using the “OutputDebugString” Win32 function, since there are numerous programs designed to capture and filter these debug strings. I use a free one called “DebugView” by Sysinternals (www.sysinternals.com)
Example: consider the situation in Figure 4, the corresponding output log looks like this:
14.218: + Pressed A
14.218: Event Jump
14.418: + Pressed X
14.418: + Pressed Y
14.484: – Released X
14.484: – Released A
The number on the left is the time in seconds. The player presses A (fig 4a) to jump (which happens in the same frame). Then the player rolls his thumb forward (figure 4b) pressing Y and X simultaneously. As the thumb rolls forward fully onto Y, they release X and A simultaneously.
Now consider the case for one the ambiguity problems we listed above, the “Super Jump” vs. ” Ground Pound” . Remember the problem was that pressing A and R1 at the same time resulted in inconsistent results. Sometimes a Super Jump, and Sometimes a Ground pound.
Here’s the output for a ground pound:
21.199: + Pressed A
21.199: Event Jump
21.215: + Pressed R1
21.215: Event Gnd_Pnd
21.232: Event Land
21.249: Event Crouch
21.432: – Released R1
21.432: Event UnCrouch
21.465: – Released A
Here’s the output for a super jump
33.778: + Pressed R1
33.778: Event Crouch
33.794: + Pressed A
33.794: Event SuperJump
33.961: – Released A
33.977: – Released R1
Note that in the first listing A is pressed before R1 (by 0.016 seconds), so the game triggers a jump first, and then a ground pound.
In the second listing R1 is pressed 0.016 seconds before A is pressed, meaning the game triggers the crouch, then as we are crouched, it triggers a Super Jump when A is pressed.
To the player, it looks and feels like they attempted to do the same thing both times. They simply pressed A and R1 simultaneously. There is no way whatsoever that they can distinguish between the two events described above. The response of the game is inconsistent and ambiguous. There is no clear link formed in the player’s mind between action and response. They get annoyed. Your job is to stop this happening.
Log files are useful but can be rather dense, and difficult to pore over. The lines all look alike, and the problem can be hidden in a dense flurry of events. The next step is to present this information in a graphical format.
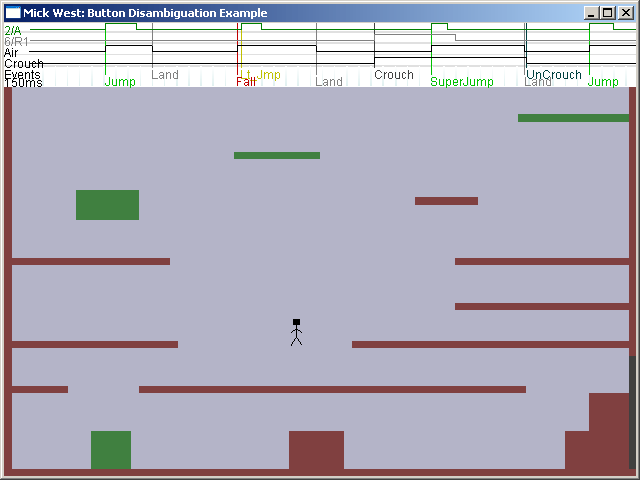
This is what I’ve done in the example platform game that accompanies this article. All I did was add a simple “watcher” class which would record the value of a variable (such as a button up/down state, or a physics state or flag) every frame and then display this as a scrolling state graph across the top of the screen, with a separate line for each variable that was being watched. (Figure 7)
To this state graph I added an event recorder which recorded events (jump, land, fall, super jump, late jump and crouch) and displayed them on the graph as a vertical line, labeled with the event.
Finally I made the graph able to be scrolled and zoomed in and out by the joypad when the game is paused.
So, whenever some control problem occurs it’s very easy to pause the game, and then scroll over and zoom into the area on the graph that caused the problems.


Take a look at a simple example, sans events. Figure 8a shows the state graphs for the A and X buttons that correspond to a precise player tapping from A to X. When the line is up, that means the button is pressed. The lines along the bottom represent 1/10th of a second intervals. So we can see that we have a series of button presses for each button, each lasting about 1/10th of a second, separated by times where no button is pressed for about 1/10th of a second. This is typical of a precise thumb player.
Now in figure 8b we see the exact same situation but with a “sloppy” player. Here the presses last much longer 2/10ths or 3/10ths of a second, and the button presses overlap, with A and X being pressed at the same time when moving between buttons. Note thought that the total time between the first press of button A, and the last press is about the same in both examples.

Let’s look at the late jump problem. Player runs to the edge of the cliff and jumps. They don’t jump, and instead fall to their doom. The graph for this is in Figure 9. I’ve added a Watcher on the “Air” state so you can see when it transitions between ground and air. We can actually see that the player hit the jump button just 16.7ms after leaving the ground. Not only is this amount of time too small to recognize, but the frame display the player off the edge of the cliff WILL NOT EVEN HAVE BEEN RENDERED YET! The player is not going to understand that your internal representation of his position indicates he can’t jump. He’s just going to be annoyed that it looked like he should jump and he did not.
How to fix this problem? Well, the slightly non-intuitive thing to do is to allow the player to jump for a short period after they have left the ground. Typically this period will be 0.2 seconds or less. In my sample game it’s 0.1 seconds, but in a 3D game you’ll probably use a longer time as the visual representation is less precise.
The new rule for this is:
If button A pressed and IN AIR and ON_GROUND 0.1 seconds ago then JUMP
This allowing a late jump removes the uncertainty – if the player jumps at the edge, then they will always jump. They do not have to be accurate. In fact they would have to be very inaccurate to miss the jump.
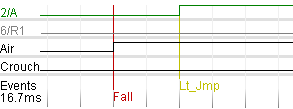
.Compare with the end of figure 9.
Figure 10 illustrates this solution in action. You see A is pressed two frames after the player starts to fall. But we still allow a jump.
Will this late jump look odd? Generally it will look just fine. Sometimes it looks a little unusual if the player jumps at the very extremity of the late jump window. Also you have to make sure your animation and sound don’t glitch as you momentarily go from ground to fall to jump in the course of 0.1 seconds. But the player will tolerate a little oddness now and then far more than they will tolerate unresponsive controls.
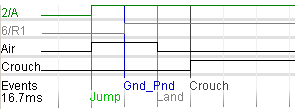
Now our second problem – the Super Jump vs. Ground Pound for which we printed out the event logs earlier. Figure 11 illustrates this situation. We see that A is pressed causing us to jump. Then on the next frame, R1 is pressed in the air so we immediately get a ground pound and then land again, all in the course of 0.033 seconds.
Then the other case is show in Figure 12, where the Player hits R1 0.016 seconds before A, so we get a crouch, and then we trigger a Superjump. Again the difference between the sequence of events in Figures 11 and 12 is just 0.016 seconds, 1/60th of a second. Not enough time to blink!
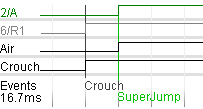
How to fix this problem? First of all, let’s decide what pressing A+R1 should actually do. Since we are on the ground, the player is probably trying to do a super jump. So all you have to do is add another rule similar to the late jump:
If A+R1 pressed and IN AIR and ON_GROUND 0.1 seconds ago then SUPERJUMP
Strategies for Resolving Ambiguity
I’ve presented some specific solutions here for two examples of ambiguity by adding additional “disambiguation rules” to your player control logic. I believe that to achieve truly intuitive and responsive player control, this type of disambiguation rule is going to be your primary tool.
Disambiguation rules are very application specific; they also can end up being rather complicated. It is important not to shy away from adding complex layers of rules simply because it makes your code (or data) look messy. If you detect a control ambiguity, and you can add a rule, then go ahead and add it.
The logic you are implementing is NOT elegant. You are creating a interface between a highly complex multi-state and multi-variable simulation, and a very ill-defined set of potential physical players. It is inevitable that there will be a high degree of ambiguity which can only be resolved by a similar degree of complexity, and that your code and data will need constant adjustments.
To fix a control ambiguity problem, first find out EXACTLY what is happening by means of tools such as the ones I have described herein. Then ask: “for this state and this input, what should happen” . The add disambiguation rules to make that happen. Test. Repeat.
Final Thoughts
Many controllers have analog buttons, where you can tell how hard the player is pressing a button. You can get more information about the intentions of the player by taking this into account (for example, an accidental press will often have a lower pressure than an intentional press). This does however greatly raise the level of complexity needed.
As well as buttons; you have the analog sticks. With its far greater number of states it can be difficult to disambiguate. The state graphs I’ve show above can easily be extended to include analog values.
An ideal framework for player control development would allow you to record the game state and inputs for the duration of the problem, and then replay it, editing the rules on the fly until the problem is resolved.
Game designers, programmers and testers need to be aware of the problems of input ambiguity. By educating the testers, you can have them analyze their own input when they encounter a difficulty. Testers are often highly skilled players, used to accommodating frustrating controls. Teach them not to accept the slightest annoyance, and instead figure out exactly what they are doing to trigger it. Your game should be accessible to as many people as possible.
Some comments on this article:
http://www.the-nextlevel.com/board/showthread.php?t=36523
Comment by Mick West — January 4, 2007 @ 10:08 pm
[…] It”™s the fundamental activity of Super Mario 64 and it feels great. It has its quirks and input ambiguities, but it”™s hard to argue that this sensation is the foundation the rest of the game sits on. […]
Pingback by » Prototyping for Game Feel — October 3, 2007 @ 9:51 am
what about the backflip (ground – > crouch – > jump ?)
if the user was moving, he’s prolly trying a longjump. I think (through experiance), that they detect this by deciding on how much the analog stick is tilted.
Comment by Ape-Inago — November 30, 2008 @ 7:09 pm
I use a Hardnox C11 Stick, very cool tool and no problems like this.
Comment by xt Commerce Templates — August 22, 2009 @ 2:32 am
I like also the Hardnox C11 Stick. It works very well a long time.
Comment by Angelreisen — November 29, 2009 @ 12:07 pm
nice explanation, but not easy realize
Comment by waldkraiburg — December 8, 2009 @ 1:59 am